Starting a diamond painting project can feel exciting yet unfamiliar for someone new to the craft. It combines creativity with a simple step-by-step process, which makes it easy to learn while still producing satisfying results. The first steps focus on setting up the right materials and space so the project feels organised and enjoyable from the start.
This activity allows anyone to create artwork with small, sparkling pieces that fit neatly into a guided design. By learning how to prepare the canvas, arrange tools, and follow a clear method, a beginner can move smoothly into the process without confusion. Each stage builds confidence and leads naturally towards a finished piece that looks polished and complete.
Select a Beginner-Friendly Canvas, Such as a Small Coaster or Greeting Card Design
A small canvas helps new painters build confidence without feeling overwhelmed. Coasters, bookmarks, or greeting cards give enough space to practise placing drills neatly while keeping the project simple and manageable. These formats also finish quickly, which makes the process more enjoyable.
Beginners should look for kits that include pre-printed guides and clear symbols. This makes it easier to match each drill to the correct spot. Smaller surfaces also reduce the chance of errors, which helps develop good habits early on.
Choosing a project such as a coaster or card allows painters to see progress in a short time. This can motivate them to continue with larger designs later. It also provides a finished piece that can be used or gifted.
For those starting out, a diamond painting artwork kit with a small canvas offers a straightforward way to learn the basics before moving on to more detailed projects.
Organise Your Workspace with Good Lighting and a Flat Surface

A diamond painting project requires a clear and steady area. A flat surface helps the canvas stay smooth, which makes it easier to place the tiny drills in the right spots. A sturdy desk or table often works best.
Good lighting reduces eye strain and makes colours easier to see. Natural daylight is ideal, but a bright desk lamp can also work well. Balanced light helps the eyes stay comfortable during longer sessions.
It is helpful to avoid shadows across the canvas. Position the light so it shines directly over the work area without glare. This setup allows each symbol on the canvas to remain visible and easy to read.
Keeping the workspace tidy also supports focus. With a flat surface and clear lighting, the project feels more manageable. These simple adjustments make the activity smoother and more enjoyable from the very start.
Unpack and Sort Your Diamond Kit, Including Canvas, Diamonds, Tweezers, and Wax Pad
Start by opening the kit and laying out all the pieces on a flat surface. Most kits include a printed canvas, coloured resin diamonds, an applicator pen, a small tray, tweezers, and a wax pad. Checking each item first helps avoid confusion later.
Next, unroll the canvas and place it flat. The surface usually has a printed chart with symbols that match specific diamond colours. Keeping the canvas smooth makes it easier to read and work on.
After that, organise the diamonds. Many kits provide small bags or containers with labels. Sorting them by colour and number before starting saves time and reduces mistakes.
Place the tweezers, pen, tray, and wax pad nearby so they remain easy to reach. Having the tools arranged neatly allows the project to progress without interruptions. This simple preparation step sets up a smoother and more enjoyable process.
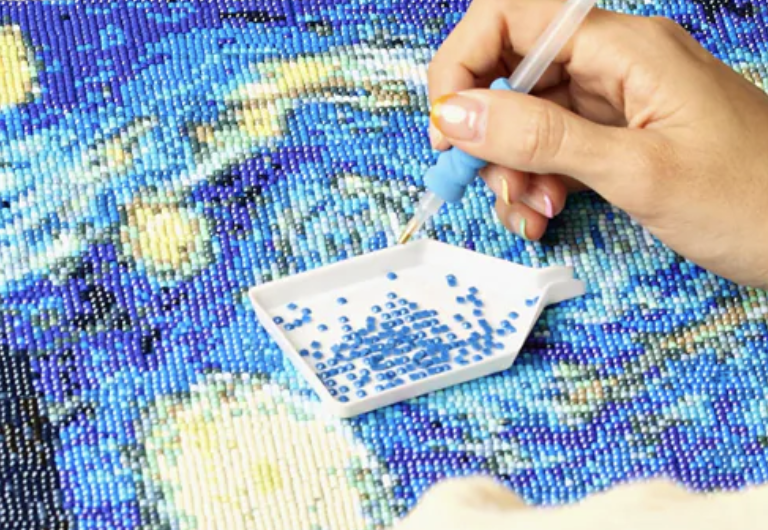
Use the Wax Pad to Pick up Diamonds Easily with the Applicator Tool
The applicator tool works best after it has a small amount of wax on the tip. To prepare it, the user presses the pen tip gently into the wax pad included in the kit. This step allows the tool to grip each diamond securely.
After the wax is in place, the pen can lift a diamond from the tray with little effort. The wax creates just enough hold to carry the diamond to the canvas without slipping. This makes placement more accurate and saves time.
It helps to refresh the wax as the project continues. Over time, the wax on the tip may lose its grip, so pressing the pen into the pad again restores its hold. By keeping the tool ready, the user can continue placing diamonds smoothly across the design.
Some people prefer to press into the side of the wax pad instead of the centre. This method helps the pad last longer and keeps the wax surface even. Simple habits like this make the process easier and more consistent.
Follow the Colour-Coded Chart on the Canvas to Apply Diamond Methodically
Each canvas includes a printed chart with symbols that match specific diamond colours. The chart acts as a guide, so the painter knows exactly where each diamond should go. This step keeps the design accurate and prevents mistakes.
The painter should peel back a small section of the protective film to expose the sticky surface. Working in small areas helps keep the canvas clean and avoids dust sticking to the adhesive. It also makes the process more manageable.
Next, they can check the chart, pick up the correct diamond with the applicator pen, and place it directly on the matching symbol. Pressing lightly secures the diamond in place without damaging the canvas.
It helps to move across the canvas in an organised way, such as row by row or section by section. This method prevents confusion, reduces the chance of misplacing colours, and creates a smooth, even finish.
Conclusion
Starting a diamond painting project becomes simple once the basic steps are clear. A beginner only needs the right kit, a clean workspace, and a little patience to move forward with confidence.
The process encourages focus and steady progress, which makes it easy to enjoy without pressure. Each step builds on the last, so the project feels organised and manageable.
With the right preparation and approach, anyone can complete their first design and feel ready to take on more detailed projects in the future.